How Do You Put Together Boltless Metal Shelving?
To assemble metal shelving, fit the crossbars into the upright slots, seat each connection, and add shelves in the order shown in the instructions. Work on a level floor, wear gloves, and check the frame before loading it.
On this page (10 sections)
- What should you do before assembling metal shelving?
- How do you assemble boltless metal shelving step by step?
- What should you check before loading the shelves?
- How do you assemble metal shelving without a mallet?
- What makes boltless shelf connections difficult?
- Should you anchor a freestanding shelf after assembly?
- Which metal shelving unit fits your assembly needs?
- What mistakes should you avoid when assembling metal shelving?
- How should you finish and use the assembled rack?
- How do you choose the right way to assemble metal shelving?
To assemble metal shelving, fit the crossbars into the upright slots, seat each connection, and add shelves in the order shown in the instructions. Work on a level floor, wear gloves, and check the frame before loading it.
Boltless shelves connect with interlocking parts instead of nuts and bolts, but designs differ. The unit's instructions should guide the exact part order, tapping method, and shelf positions.
What should you do before assembling metal shelving?
Clear a level work area and check the parts against the instructions before you start. Leave room to lay out the uprights and crossbars, then stand the finished frame without hitting a ceiling, vehicle, or stored items.
Wear gloves while handling metal parts. Use a rubber mallet only if the instructions call for it, and avoid striking the frame with a hard hammer that could bend a connector.
Measure the final location, doorway, and path into the room. A tall, wide rack can be awkward to turn after assembly, so check the route before building it.
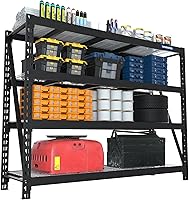
Choose a unit that fits the items and the space. For example, the VEVOR unit measures 48 x 24 x 72 in and weighs 64.8 lb, while the REIBII and VDEVY units are also 48 x 24 x 72 in and weigh 61.5 lb and 60 lb.
Allow room to reach the shelves and pull bins out.
How do you assemble boltless metal shelving step by step?
Build one stable section at a time and follow the unit's own instructions. The parts and order vary, but these steps describe the usual process for interlocking shelving.
- Lay out the uprights, crossbars, shelves, connectors, and hardware.
- Identify the slots or marks that set each shelf height.
- Fit the first pair of crossbars into the upright slots at the height shown.
- Add the matching crossbars to create a square or rectangular frame.
- Seat each connector fully, tapping gently with a rubber mallet if instructed.
- Add the next frame section and repeat for the remaining shelves.
- Check that the frame is straight, the shelves are level, and every joint is secure.
Some units can split into two shorter racks. Confirm that feature in the instructions before separating or joining sections, since the option is not universal.
How should you choose shelf heights when assembling metal shelving?
Set the crossbars around the objects you plan to store, with enough clearance to lift them on and off. Measure tall containers, tool cases, and boxes first, then leave room for handles, lids, or fingers.
Place heavier items on lower shelves to keep the rack less top-heavy. Put frequently used items at a comfortable height, and leave high shelves for lighter things you do not need every day.
Adjusting a loaded shelf is harder and can be unsafe. Unload it first, then follow the instructions for releasing or moving the crossbars.
What should you check before loading the shelves?
Make sure the frame is level, straight, and fully connected before adding weight. Look across each shelf to confirm it rests evenly on its supports, and check the uprights for gaps or a visible lean.
If one side sits higher, adjust the frame on the floor rather than trying to correct it by loading a shelf. Do not use the unit if it rocks, a connector is loose, or a part is damaged.
Load gradually and spread items across the shelf. Stay within both the total unit capacity and each shelf's stated limit; this guide to per-shelf weight ratings explains why the two numbers are different.
How do you assemble metal shelving without a mallet?
Use a mallet only when the instructions recommend one. Some joints seat by hand, while others need careful taps to lock the connectors into place.
If a connector resists, check its direction and alignment instead of adding force. Do not use a hammer or makeshift tool that could deform the metal.
The VEVOR 5-tier unit uses snap-fit assembly, adjustable shelf heights, and includes a rubber hammer and gloves. Its 48 x 24 in footprint suits a garage or storage area with room for a deep rack, while the two-piece option may help if you need separate storage sections.
VEVOR says the unit can split into two racks. Choose it if you want that flexibility and the floor space for a 24 in deep shelf; skip it if your doorway or storage area is too narrow for its dimensions.
What makes boltless shelf connections difficult?
Misaligned slots, reversed parts, and an uneven work surface are common reasons a joint will not seat. Pause and compare the part orientation with the instructions rather than forcing it.
Check that both ends of a crossbar sit at the same height. If one end is seated and the other is not, the frame can twist and make later connections harder to fit.
Keep small connectors and shelf supports together as you work. If a part is missing or damaged, contact the manufacturer instead of substituting an unrelated fastener.
The REIBII 48 in unit has adjustable crossbars that move in 1.4 in steps, and its five-tier frame can split into two racks. The 24 in depth is useful for deep bins and larger tools, but measure your aisle and doorway because that depth can take up valuable floor space.
REIBII uses tool-free interlocking assembly and includes a rubber mallet and gloves. Choose it when deep storage and the option to split the unit matter; skip it if you need a shallower rack or cannot spare the floor area.
Should you anchor a freestanding shelf after assembly?
Anchor the rack when its instructions require it or when the setup could tip. A tall frame, uneven floor, or heavy items stored high can increase that risk.
Use the specified attachment points and hardware for both the shelf and wall. If you are unsure which fasteners suit your wall, ask a qualified installer or hardware professional.
Read how to anchor a garage shelf to the wall before drilling. For placement and space planning, see how to put shelves in a garage.
Which metal shelving unit fits your assembly needs?
Choose based on the frame design, storage dimensions, and adjustment options you will actually use. VDEVY's 48 x 24 x 72 in, five-tier unit has adjustable crossbars and a boltless interlocking design, with instructions, gloves, and a hammer included.
VDEVY's double-column structure is intended to support the frame, and the unit can be divided into separate shelf sections. It suits a flexible garage or basement layout; skip it if you need a different width or depth, or if you want a rack with published shelf spacing increments.
Before choosing any of the three, compare its dimensions with the storage area and the items you plan to keep there. Read what boltless shelving is and how sturdy it can be if you want to understand how the joints connect before buying.
What mistakes should you avoid when assembling metal shelving?
Do not force a connector, build on an uneven floor, or load the frame before checking every joint. Each mistake can leave a shelf tilted or a rack unstable.
Avoid setting shelf heights by guesswork when a specific bin or tool needs to fit. Measure first, leave removal clearance, and keep heavy items low.
Do not drag a loaded rack to its final position. Finish assembly where practical, inspect it, and unload it before moving or reconfiguring it.
How should you finish and use the assembled rack?
Inspect the finished frame, place it on a level surface, and load it within the stated limits. Keep heavy items low and distribute weight rather than concentrating it in one spot.
Keep the rack dry and wipe up spills, especially around shelf boards and joints. Do not climb on the shelves, and unload the frame before changing its layout or moving it.
Organize bins by size and frequency of use so you can pull them out without shifting nearby items. Our guide to organizing garage shelves offers a practical way to group tools, supplies, and seasonal storage.
How do you choose the right way to assemble metal shelving?
Pick VEVOR if you want a snap-fit rack that can split into two sections, REIBII if you need 24 in deep shelves and 1.4 in adjustments, or VDEVY for an adjustable five-tier layout with a double-column frame. Check the floor area, doorway, and storage load before you decide.
For safe assembly, follow the included instructions, seat each joint fully, and confirm the frame is level before loading. If your space or items do not match a unit's size and layout, choose another rack that fits instead of forcing the setup.
Frequently asked questions
Do you need tools to assemble boltless metal shelving?
It depends on the design. These three units use snap-fit or interlocking connections.
The VEVOR and REIBII units include a rubber mallet and gloves.
Follow the unit's instructions for when to tap a joint and how firmly to seat it.
Should you assemble metal shelving upright or on the floor?
Follow the unit's instructions for the assembly position. If you build it on the floor, support the frame as you work and get help lifting it upright if it is too heavy or awkward to handle safely.
How do you make sure boltless shelving is assembled correctly?
Check that each connector is fully seated, the shelves sit level, and the uprights are straight. Compare the finished frame with the instructions before adding items.
Stop if a joint will not seat or a part is damaged, and contact the manufacturer for guidance.
Do freestanding metal shelves need to be anchored?
Anchor a shelf when its instructions call for it or the height, floor, and stored items create a tipping risk. Use the attachment points and hardware specified for the unit and wall.
See our guide to anchoring a garage shelf to the wall for more help.