How Do You Anchor a Garage Shelf to the Wall?
To learn how to anchor a shelf to a wall, fasten its frame into wall studs whenever possible. Match the fastener to the shelf instructions and wall type, and use hollow-wall anchors only for compatible shelves and loads.
On this page (10 sections)
- How do you anchor a garage shelf to a wall?
- How can you find a stud behind drywall?
- Can you anchor a shelf to drywall without a stud?
- What should you check before drilling?
- Which fastener is right for your shelf and wall?
- What mistakes make a wall connection less secure?
- Does anchoring increase a shelf's weight capacity?
- What if your shelf is freestanding?
- How do you check and care for the shelf after anchoring?
- How do you decide which setup to use?
To understand how to anchor a shelf to a wall, fasten its frame to wall studs wherever possible. Find the studs, use the attachment points and fasteners specified for the shelf, and don't rely on drywall alone to hold a loaded unit.
Anchoring can help limit tipping, especially with a tall shelf or one holding bulky items. The connection still needs to match the shelf design, wall material, and expected load.
How do you anchor a garage shelf to a wall?
Find the studs, mark the shelf's attachment points, and fasten the frame into the studs using the shelf maker's hardware and instructions. Check that the unit is level and stable before placing items on it.
- Read the shelf instructions to identify its wall attachment points and required hardware.
- Clear the shelf and move it into position on a firm, level floor.
- Find and mark the studs behind the attachment points.
- Position the shelf, check it for level, and mark the holes.
- Drill only as directed for the fastener and wall material.
- Attach the shelf frame, then check for movement before loading it.
Don't drill until you've checked for wiring, pipes, or other hidden services. Stop if the instructions don't match your wall or you can't confirm a safe attachment point.
Before starting, gather the instructions, fasteners, a level, pencil, drill, and a stud finder if you need one. Keep the shelf empty while you position and secure it, and make sure you can reach every attachment point without stretching or balancing on the unit.
How can you find a stud behind drywall?
Use a stud finder to locate framing, then mark the center before drilling. Check the device instructions and confirm the reading at more than one point along the intended attachment area.
The Franklin ProSensor M210 has 13 sensors, needs no calibration, and shows the full width of a stud on its LED display. It detects wood and metal studs and includes live-wire detection.
A stud finder helps locate framing, but it doesn't confirm that a spot is free of every pipe or wire. Use caution around outlets, switches, plumbing fixtures, and areas where services may run.
For a shelf with multiple attachment points, locate each stud separately. Don't assume studs are spaced exactly as expected or that one reading applies across the whole wall.
Can you anchor a shelf to drywall without a stud?
Use a hollow-wall anchor only when the shelf instructions allow it and the fastener suits the wall and load. A toggle bolt's wings expand behind hollow drywall, but the connection still depends on wall condition, thickness, and correct installation.
The KURUI Toggle Bolt Anchor Kit includes 3 sizes for selected hollow-wall projects. Its steel toggles are intended for appropriate decorative hanging and light shelving, not heavy mounts or heavy ceiling installations.
Choose this kit only when you need a compatible hollow-wall fastener and can match its size to the job. Skip it for a heavy or top-heavy shelf, a shelf whose instructions require stud attachment, damaged drywall, or a wall whose thickness you can't confirm.
Don't assume a toggle is a replacement for a stud connection. If you can't confirm that an anchor fits the wall and shelf, choose another location or ask a qualified installer.
What should you check before drilling?
Confirm the shelf's mounting instructions, wall type, and attachment location before making holes. A strong fastener in the wrong place can still leave the unit unstable.
Check for outlets, switches, plumbing, and other signs of hidden services. Use a detector as directed, and stop if you aren't sure what's behind the wall.
Set the shelf on a level floor and position it so the frame holes line up with the wall framing. If the holes don't line up with studs, don't drill new holes in the shelf unless its maker permits that change.
Our guide to putting shelves in a garage covers placement and setup. For boltless rack assembly, see how to put together boltless metal shelving.
Which fastener is right for your shelf and wall?
Choose the fastener specified for the shelf and wall, with a stud connection as the first choice when available. A stud finder helps identify framing; a toggle bolt can work only for a compatible hollow-wall application and load.
A direct stud connection suits shelves designed to attach to framing and gives the fastener wood or metal framing to engage. Check the shelf instructions for the correct fastener and attachment points.
Follow the specified number of connections, and don't substitute a different screw just because it fits through the frame.
A hollow-wall toggle is for a different situation: the attachment point lands in hollow drywall, the shelf allows that kind of anchor, and the load is suitable. The KURUI assortment offers several sizes for selected hollow-wall jobs, but size options don't make it appropriate for every shelf.
If the wall is masonry, plaster, or another material, use instructions and fasteners made for that wall type. Don't carry drywall guidance over to a different surface.
What mistakes make a wall connection less secure?
The most common mistake is choosing an anchor before confirming the shelf, wall, and load requirements. A fastener's size or appearance alone doesn't mean it suits the installation.
Avoid these errors:
- Relying on drywall for a heavy unit. Use studs when the shelf instructions call for them; drywall anchors have limits.
- Guessing where the studs are. Confirm each attachment point, rather than estimating from one mark.
- Drilling before checking for services. Stop if you can't rule out wiring or plumbing in the drilling area.
- Skipping the level check. A tilted frame can make the shelf unstable and complicate loading.
- Adding random screws. Extra holes may not improve the connection and can damage the frame or wall.
- Loading before checking for movement. Confirm that the unit sits firmly and each attachment point is secure first.
If an attachment point doesn't align with framing or the instructions don't cover your wall, pause and choose a suitable location or get help from a qualified installer.
Does anchoring increase a shelf's weight capacity?
**No. Anchoring helps secure the unit.
It doesn't raise the shelf's stated weight limit.** Follow the maker's load guidance and distribute weight as directed.
Keep heavier items low to reduce the chance of a tall unit becoming top-heavy. Don't climb on shelves or use them to support people.
For more on load labels, read what a per-shelf weight rating means. If you need help choosing a shelf for your storage, start with garage storage shelves and setup options.
What if your shelf is freestanding?
Check whether the freestanding unit includes or requires an anti-tip connection. Place it on a firm, level surface and follow its instructions for wall attachment and loading.
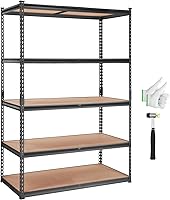
The REIBII 2 Pack Garage Shelving includes 2 five-tier freestanding units and an anti-tipping device. Each unit measures 36 in wide, 16 in deep, and 72 in high, with adjustable tiers and a stated total capacity of 2,400 lb per unit when weight is evenly distributed.
This set suits someone who needs adjustable storage and intends to secure the frame as directed. Skip it if you need a wall-mounted shelf or can't fit a 72 in tall, 36 in wide, 16 in deep unit in the chosen spot.
Don't infer a safe wall fastener or load from the shelf's freestanding design. Use the included kit as directed and confirm the wall connection fits your wall.
How do you check and care for the shelf after anchoring?
Check that the unit stands level and each wall connection is snug before loading it. Apply gentle pressure to the frame and look for shifting, looseness, or a gap opening at the wall.
If the unit moves, unload it and review the installation instructions. Don't try to fix movement by adding random screws or tightening hardware beyond the maker's directions.
Load the shelf gradually, keeping heavy items on lower tiers and spreading weight as directed. Recheck the connections if the shelf shifts, the wall material cracks, or you move the unit.
For routine care, keep the frame and wall connection visible enough to inspect. Wipe shelving surfaces as the shelf maker directs, and avoid letting stored items press against or pull on the fasteners.
How do you decide which setup to use?
Pick a stud connection for a shelf designed to attach to framing, and use a hollow-wall toggle only for a compatible shelf and load. If the shelf is freestanding, follow its anti-tip instructions and verify the wall connection before loading.
Choose the Franklin ProSensor M210 if you need to locate and mark stud centers across several attachment points. Choose the KURUI kit only for a suitable hollow-wall application, not as a shortcut around stud attachment requirements.
Choose the REIBII shelving if you need two adjustable freestanding units and can anchor them as directed. If your shelf instructions require studs but the frame won't align with them, select another location or another shelf.
For wall-mounted storage options, see garage wall shelves that clear the floor. Before loading any setup, check its weight guidance and confirm the connections remain secure.
Frequently asked questions
Should a garage shelf be anchored to a wall stud?
When the shelf instructions call for wall anchoring, attach it to studs when possible and use the specified fasteners. A stud connection gives the fastener framing to bite into.
Don't assume drywall alone can support a loaded shelf.
The wall material, fastener, shelf design, and load all affect the connection.
Can you anchor a garage shelf to drywall without a stud?
Use a drywall anchor only if it suits the shelf, wall thickness, and intended load. Hollow-wall toggles spread behind drywall, but they don't make every shelf or heavy load safe.
Follow the shelf and fastener instructions, and choose another location if the fit is uncertain.
How many anchors does a garage shelf need?
Use the number and locations specified by the shelf manufacturer. The right count depends on the frame, wall, and fasteners, so adding screws in random spots isn't a substitute for the instructions.
Keep the shelf level and confirm each attachment point is secure before loading it.
Does a freestanding garage shelf need to be anchored?
Follow the shelf maker's anchoring instructions, especially for tall or top-heavy units. Place a freestanding shelf on a firm, level floor, load heavier items on lower shelves, and secure it to suitable framing when required.
Anchoring helps limit tipping, but it doesn't increase the shelf's stated weight capacity.