How to Put Shelves in a Garage, Step by Step
To put shelves in a garage, choose a shelf that suits your wall and storage needs, find the supports, mount it level, and load it within its limits. Check for wiring and pipes before drilling, and follow the shelf maker's instructions.
On this page (9 sections)
- What should you decide before putting shelves in a garage?
- How do you choose a garage shelf and the right tools?
- How to put shelves in a garage: where should you mark the supports?
- How do you mount shelves on a garage wall?
- How do you check a garage shelf before loading it?
- How should you organize and care for garage shelves?
- What mistakes should you avoid when installing garage shelves?
- How do you decide which garage shelving setup to use?
- How to put shelves in a garage safely
To put shelves in a garage, choose a location, find the supports, level the mounting points and fasten the shelf with hardware suited to the wall and shelf. Check for wiring and pipes before drilling, then confirm the shelf is secure before adding weight.
The right setup depends on what you plan to store and what your garage walls are made of. Measure the space, compare the shelf’s mounting pattern with the wall, and use the installation instructions and load limits to guide the work.
If you are still choosing a setup, start with our guide to picking garage storage shelves. It can help you decide between wall-mounted shelves and a freestanding unit before you mark holes.
What should you decide before putting shelves in a garage?
Before putting shelves in a garage, decide what the shelf will hold, where it can go, and whether your wall can support its mounting system. Those answers help you choose a shelf, set a practical height and avoid drilling in the wrong place.
Measure the open wall and the largest items you want to store. Check the shelf’s width and depth against the space, and leave room for doors, parked vehicles, switches and anything else you need to access.
Think about how often you will use each item. Keep daily tools and supplies at an easy height, while seasonal gear can go higher if you can lift it down safely.
Very heavy items are often easier to manage on a lower shelf or another storage solution.
Decide whether you want to attach shelves to the wall or use a freestanding unit. A wall-mounted shelf can keep floor space open, but the wall and mounting points must suit its instructions.
A freestanding unit avoids wall brackets, but needs a stable, level floor and enough clearance.
Check the wall construction before choosing a shelf. Wood studs, concrete, brick and metal studs require different mounting considerations, and a shelf that supports one wall type may not be suitable for another.
Our guide to choosing garage shelving compares the tradeoffs between common setups. If you are planning wall storage, our overview of garage wall shelves can help you compare shelf formats.
How do you choose a garage shelf and the right tools?
Choose a shelf whose mounting method, dimensions and load instructions fit your wall and the objects you plan to store. Gather the tools and fasteners called for in its instructions before starting.
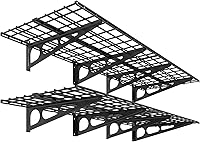
A wall shelf is a fit when its bracket positions can align with suitable supports and its depth and width work for the items and wall space. For example, the FLEXIMOUNTS 2-pack contains two 24 x 72 in shelves, with a stated design for wood studs spaced 16, 18 or 24 in apart, concrete or brick walls.
FLEXIMOUNTS says each shelf unit holds up to 350 lb and the pair has a 1,400 lb total capacity. Those figures do not remove the need to follow the installation guide or account for the wall, fasteners and how weight is distributed.
This shelf is a poor fit for a metal-stud wall because FLEXIMOUNTS says it cannot be mounted there. Skip it if its 24 in depth or 72 in width will obstruct a door, vehicle, walkway or other garage use.
For the basic setup, gather a tape measure, pencil, level, drill, the specified fasteners and the correct drill bit. A stud finder can help locate wood framing behind a finished wall.
The M210 scans without calibration and has a built-in bubble level and live-wire detection. It needs 2 AA batteries, which are not included; live-wire detection is an extra feature, not a replacement for checking for wiring and pipes before drilling.
A stud finder is useful when the wall is covered and you need to map stud locations across the shelf area. You can skip buying one if you can reliably identify the supports by another method, but do not guess their locations for a shelf that needs structural support.
For hollow-wall projects, the KURUI kit includes toggle bolts and wing nuts in several sizes. Its intended use is selected hanging projects and light shelving on hollow walls, not heavy mounts or heavy ceiling installations.
Do not choose this kit as a shortcut for a heavy garage shelf. Holding performance depends on wall condition, thickness and correct installation, so use the shelf maker’s specified mounting method for substantial loads.
How to put shelves in a garage: where should you mark the supports?
To mark the supports, scan the planned shelf area, identify stud centers and check that the shelf’s holes line up with them. Measure the spacing and compare it with the shelf’s mounting pattern before drilling.
Start by marking the intended shelf height and the ends of the shelf. Check the wall for outlets, switches, visible wiring and plumbing, then scan across the full area where brackets may go.
Follow the stud finder’s instructions. With the Franklin ProSensor M210, the display shows the full width of a stud and the middle LED indicates its center.
Mark each center lightly so you can erase marks after the installation.
Measure between centers instead of assuming the studs follow a particular spacing. The FLEXIMOUNTS shelf is designed for wood studs at 16, 18 or 24 in spacing, but the bracket holes still need to align with the actual wall supports.
Hold the shelf template or a bracket against the marks and check the fit. If the holes do not align, move the planned shelf location or select a system designed for that wall.
Do not angle a fastener or shift a bracket away from its intended mounting points just to make it fit.
Before making any hole, check the planned drilling area for possible wires or pipes. If you cannot tell whether a spot is clear, move the shelf or ask a qualified professional to assess it.
Our step-by-step guide explains how to anchor a shelf to a garage wall, including why wall type and fastener choice matter.
How do you mount shelves on a garage wall?
Mount wall shelves by placing the supports at the marked height, checking alignment and level, and fastening them in the sequence the instructions specify. The exact steps depend on the shelf design and wall material.
Read the entire installation guide before drilling. Confirm that you have the right hardware, drill bit and tools, and lay out the shelf parts so you can reach them without leaving a bracket unsupported.
A typical sequence is:
- Hold the template or first bracket at the planned height.
- Mark the holes that align with the supports or approved mounting points.
- Use a level to position the other brackets at the same height.
- Recheck the measurements and confirm the holes avoid wires and pipes.
- Drill with the bit and depth specified in the instructions.
- Fasten each support with the required hardware.
- Attach the shelf components in the order shown in the guide.
- Check the shelf for level and movement before loading it.
Tighten fasteners securely, but do not damage the wall or fastener by forcing them. If a screw turns without holding, a bracket sits away from the wall or the shelf rocks, stop and correct the mounting before use.
The FLEXIMOUNTS system includes an installation template and bubble level. It is designed for wood studs, concrete or brick, but not metal-stud walls.
Toggle bolts work by opening behind a hollow wall, where the wings spread the contact area. They are appropriate only when the wall, fastener size, shelf and intended load suit that method; do not assume that any toggle bolt can support a heavy shelf.
For a shelf that uses boltless metal framing, follow the parts and sequence in the assembly guide. See our instructions for putting together boltless metal shelving.
How do you check a garage shelf before loading it?
Before loading, check that the shelf is level, every support is secure and the assembled shelf does not shift. Correct any movement or misalignment before putting stored items on it.
Look at each bracket and fastener. The supports should sit as intended, with no loose hardware, bent parts or visible separation from the wall.
Check the shelf surface, too, and make sure the components are assembled in the right order.
Start with a light load and spread items across the shelf. Add heavier items gradually, following the shelf’s instructions for the capacity of each shelf or tier.
An overall capacity for a multi-shelf set is not the per-shelf limit.
Keep weight balanced instead of concentrating a heavy object at one edge. Store heavy items lower when possible, especially if lifting them down from a high shelf would be awkward.
Do not use a shelf if it shifts, sags or makes an unusual sound as you load it. Remove the load and inspect the installation, fasteners and shelf assembly before trying again.
If the shelf will hold bins, check that they fit without blocking the shelf above or hanging over the edge. Our guide to storing bins in a garage covers ways to keep containers accessible.
How should you organize and care for garage shelves?
Organize garage shelves by grouping similar items, keeping frequent-use gear within reach and leaving enough room to remove each item safely. A simple layout makes the shelves easier to use and helps prevent unstable stacks.
Put small parts in containers so they do not scatter between larger items. Group tools with related supplies, and label bins if more than one person uses the storage area.
Keep seasonal or rarely used items higher only if you can reach them without climbing on the shelves.
Leave space around items you need often. A tightly packed shelf can make you pull one object past another, increasing the chance that something falls or that you overload an edge while reaching.
Keep walkways, doors and vehicle clearance in mind after loading. If the shelves make it hard to move through the garage or open a door, adjust the layout rather than forcing items into the remaining gaps.
Follow the shelf’s care instructions. The FLEXIMOUNTS shelves specify wiping with a dry cloth.
Check the fasteners and shelf condition periodically, especially after moving stored items or changing the load.
Our guide to organizing garage shelves offers more ways to group tools, supplies and bins.
What mistakes should you avoid when installing garage shelves?
The most common mistakes are choosing a shelf that does not suit the wall, guessing at support locations, using the wrong anchors and loading before checking the installation. Take time to confirm each of those choices before relying on the shelf.
Do not assume drywall can carry a heavy shelf by itself. Use the mounting method required for the shelf and wall, and anchor to supports when the instructions call for it.
Do not assume a stud finder’s reading tells you that a drilling spot is clear of wiring or plumbing. Check the area before drilling, and move the shelf or get help if you are unsure.
Avoid marking bracket holes before checking the shelf’s actual mounting pattern. A shelf can be level on the wall but still have fasteners in the wrong locations if the support spacing does not match.
Do not use a general-purpose hollow-wall anchor as a substitute for hardware intended for a heavy shelf. The KURUI toggle bolt kit is for selected hollow-wall projects and is not recommended for heavy mounts or heavy ceiling installations.
Do not treat the shelf set’s total capacity as a safe allowance for one shelf or one bracket. Check the instructions for the limit that applies to the particular part of the system and distribute the load.
Finally, do not climb on a storage shelf or use it as a step. Store items so you can reach them from the floor or with an appropriate ladder.
How do you decide which garage shelving setup to use?
Choose wall-mounted shelves when the wall and mounting pattern suit the shelf and you want to free floor space. Choose a freestanding unit when you need a floor-supported option or your wall does not match the mounting instructions.
The FLEXIMOUNTS 2-pack is a candidate for a wide wall area with compatible wood stud spacing, concrete or brick construction, and items that fit its 24 in depth. Skip it for metal studs or where its size blocks access.
Use a stud finder such as the Franklin ProSensor M210 when you need to locate and mark studs behind a finished wall. Its full-width display and center indicator help map bracket positions; still check the drilling area for wiring and pipes.
Consider the KURUI toggle bolt kit only for a selected light-shelf project on a suitable hollow wall. For a heavy garage shelf, use the mounting approach specified by the shelf maker rather than relying on this kit.
If the wall cannot support the shelf or its mounting pattern does not fit, compare a freestanding shelf or another storage method. To plan the next step, read our guide to garage wall shelves.
How to put shelves in a garage safely
To put shelves in a garage safely, match the shelf and fasteners to the wall, locate the supports, check for hazards before drilling, and load the shelf within its instructions. Pick a different storage setup if the wall or mounting pattern is unsuitable.
Measure first, mark the supports carefully, and check that brackets are level before fastening them. After assembly, confirm the shelf is secure and distribute stored items instead of concentrating weight in one spot.
For compatible wood stud spacing, concrete or brick walls, the FLEXIMOUNTS shelves offer a wall-mounted option; they are not suitable for metal studs. If you are deciding whether a wall-mounted setup fits your space, compare the options in our guide to garage wall shelves.
Frequently asked questions
Can I install garage shelves without finding wall studs?
For shelves meant to hold substantial weight, plan to fasten the supports to wall studs or use a mounting method suited to the wall and shelf. Hollow-wall anchors have limits, and the KURUI toggle bolt kit is not recommended for heavy mounts or heavy ceiling installations.
Follow the shelf maker's instructions.
How do I find studs before installing a garage shelf?
Use a stud finder according to its instructions, then mark the stud centers and confirm that the planned bracket holes line up. The Franklin ProSensor M210 scans without calibration and shows the full stud width, with its center LED turning green.
Check for wires and pipes before drilling.
Should garage shelves be level?
Yes. Level the shelf supports before tightening the fasteners, then check the shelf again before loading it.
A level helps items sit securely and keeps the shelf from leaning.
Follow the shelf's installation guide because bracket positions and fastening steps vary by design.
Can I mount garage shelves on drywall?
Drywall alone is not a safe basis for assuming a shelf can carry a heavy load. Match the mounting hardware to the shelf, wall construction and intended load, and use studs where the shelf instructions call for them.
Toggle bolts expand behind hollow walls, but their holding performance depends on wall condition and correct installation.